
How to Customize your Schedule
Once you have Built your Teams and Resources, Created Slot Types, Created a Template you can start to use your schedule.
You will find this when you click on the Schedule Tab:

You will then see your schedule pop-up.

Here are some options for your view of the schedule:

- Red - will allow you to toggle between days/weeks/months (depending on view in Blue)
- Green - will bring you back to today's schedule if you were on a different day
- Blue - changes the view of your schedule by:
- Day - will only see one day at a time
- 2 Days - will show you 2 days side by side
- Week - will show you a full week side by side
- Month - will show you a calendar view of your schedule
Toggle
On the upper right you will see a toggle menu. This is able to be opened or closed by clicking on the 3 lines:
Once you have clicked on it (if it wasn't open when you opened the schedule), you will see a couple of different features you can use:

- Green - Toggle for side bar menu
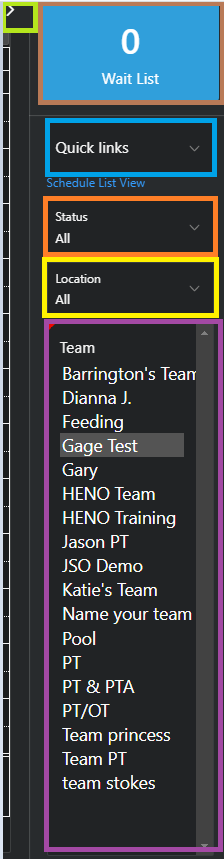
- Brown - Wait List - This shows you the current amount of patients on the wait list in HENO.
- Blue - Quick Links - these will take you to the area in HENO:
- Take Payment - if a patient is paying outside of a checkout
- Add/Edit Patient - If you wanted to toggle to the Patient Library
- Orange - Status - this will change the view on the schedule
- Filled - will only show filled appointments on the schedule (Great to use to see how many appointments are scheduled)
- Open - will only show open appointments on the schedule (Great to use when trying to find an appointment)
- Yellow - Location - if you have multiple locations and you only want to see the schedule for that location. You can select the specific location or All (to see all schedules) - This can be defaulted in the customize button
- Purple - Team - this will be the schedule associated with the team and resources created - This can be defaulted in the customize button
-
Hold CTL (or Command) and click on the Team names to see multiple schedules at once
-
See this article if you haven't done this yet: Built your Teams and Resources
-
- Hot Pink - Cancels - This will allow you to view the cancels on the schedule. You will have the option to view cancels with notice, cancels without notice, no shows, or all. - This can be defaulted in the customize button
- Gray - Telehealth - This will show only the slot types that are marked as Telehealth visits. - This can be defaulted in the customize button
- Light Blue - Customize - will allow some customizing options for the schedule
Customize Screen
If you click on the Customize button, you will get a pop-up menu over your schedule:

- Red - Hide Inactive patient - If checked when scheduling patients inactive patients will not be shown.
- Orange - Hide Chart on Schedule - If checked users can choose a patients chart when scheduling if one is created.
- Green - Show Weekends - If checked the weekends will show on your calendar
- Light Blue - Show Legend - If checked the legend will display below the schedule
- Pink - Alert on Drag - when you drag, lengthen, or shorten an appointment on the schedule, this will alert you on any of those changes with a pop up:
- Purple - Overlap Events - will show the schedule with overlapping appointments versus side by side.
- Yellow - Schedule Start and End - The starting and ending time on the schedule display.
- Blue - Display Intervals - How you want to view your schedule (the choices are 5 minutes, 15 minutes, 20 minutes, 30 minutes, 40 minuets, and 45 minutes)
- Peach - Show Tooltip - This is the hover over on the schedule that allows your to edit the patient or start the documentation without leaving the main schedule
- Gray - Cancels - This will allow you to select if your want to view Cancels with notice, cancels without notice, or no shows automatically on the schedule
- Light Green - Schedule location - This will allow you default to view all locations versus the location your user is assigned to or having it switch it on the side bar when you log in
- Brown - Telehealth - This will allow you the have the adult of the schedule to show you only the Telehealth appointments
- Light Pink - Default team - This will allow you to select what schedules you want to see when you log in. You can Click on just one, click and drag to select multiple, or hold the Control (or Command) key on the keyboard and select multiple of the list not next to each other
