
Step 7. Adding CPT Codes and Checking out the Appointment
In this Article
How to add and edit the CPT codes
Once the patient is checked in, you will see (CI) next to the patient's name on the schedule. This open access to:
1. Enter the CPT codes into the Check out Screen
2. Complete documentation (please check out Step 6)
From the Schedule
You will click on the appointment slot on the schedule of an appointment that have (CI) next to the patient's name:

In the pop-up, click on the stethoscope button on the bottom in the middle:
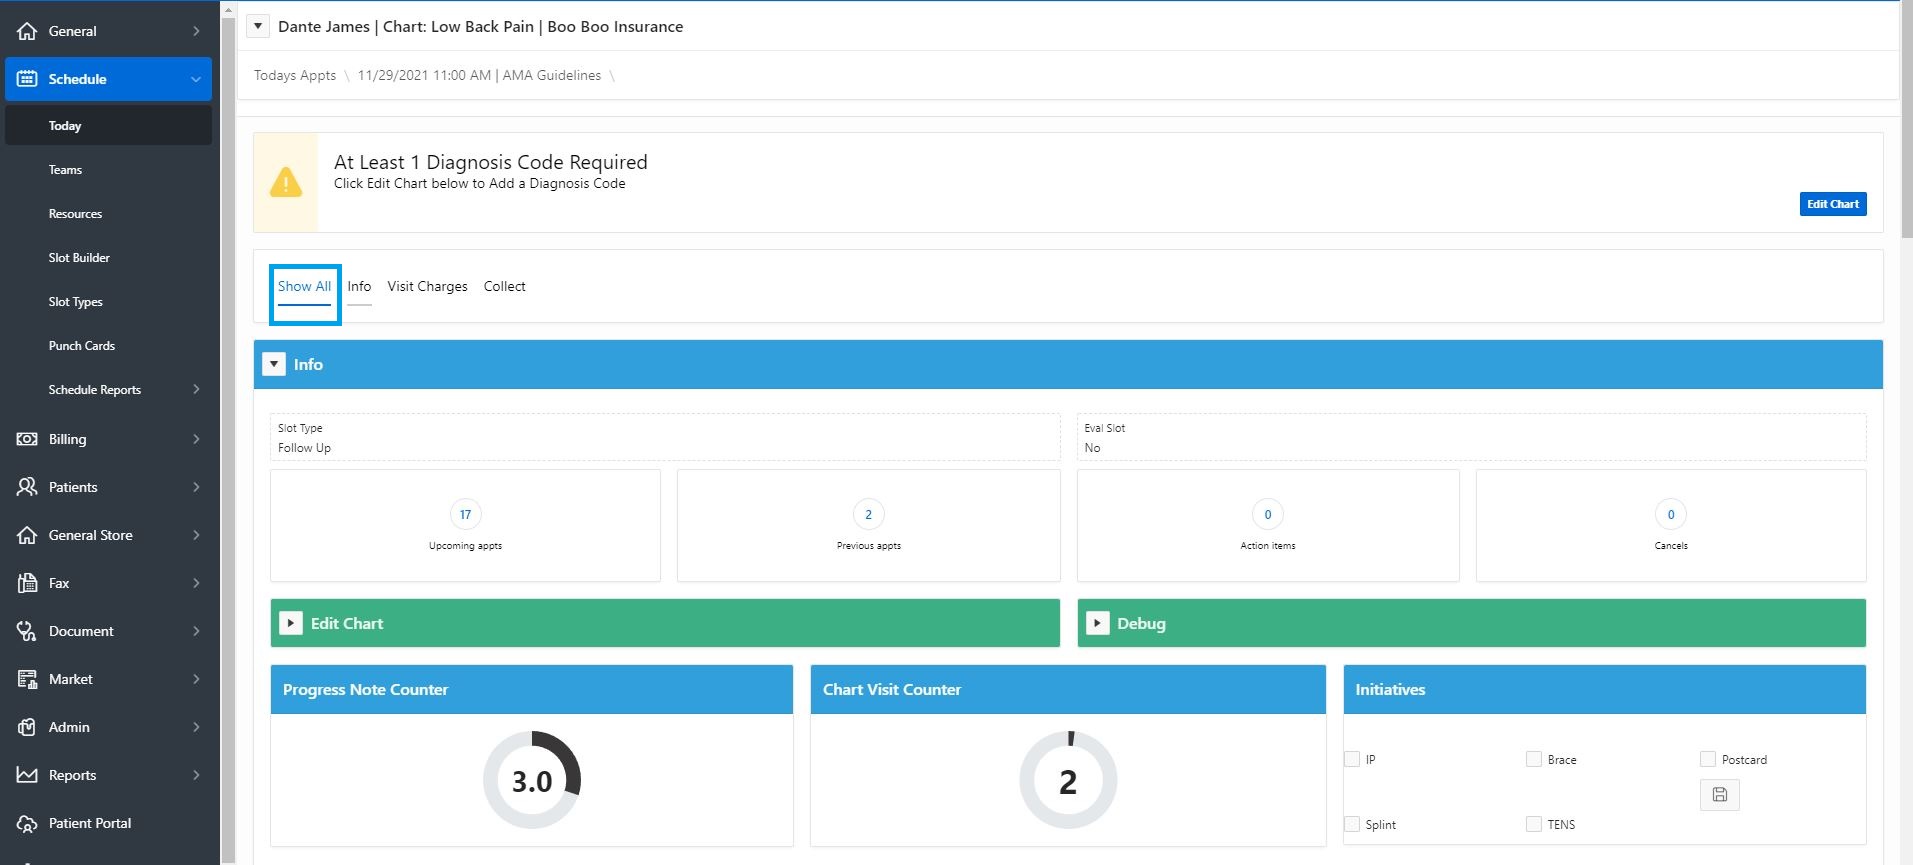
 This will bring you into the check out screen:

To Add, Edit, and set Ready for Check out, please click here
From the Evaluation, Progress Note, or Discharge
When you are inside an evaluation, progress note, or discharge, you will see a Tab called Charges:

This will bring you into the check out screen:
 To Add, Edit, and set Ready for Check out, please click here
From the Daily Note

This will bring you into the check out screen:
To Add, Edit, and set Ready for Check out, please click here
From the Flowsheet
This will be available on August 1, 2020 Release
Check out this article for how to use and add CPT codes: Using the Flowsheet
From the Experience Log
This will be available on August 1, 2020 Release
Check out this article for how to use and add CPT codes: Using the Experience log
Add, Edit, and Ready for Checkout
Inside of the check out screen, you will have the option to Add and Edit the CPT codes and set the Appointment Ready for Check out.
- Adding CPT codes to the Check out Screen
- Editing CPT codes on the Check out Screen
- Collecting payment
- Setting the Appointment Ready for Check out (or Checking out the appointment)
**Please Note: If you are using the Flowsheet or the Experience log to enter the CPT codes, we recommend editing the units/time in those areas to reflect appropriately
You have two different ways your can add the codes.
**Please Note: If you do not see your full list of CPT codes, this is either do to the insurance is set up as Listed Codes only or the Auth on file has limited CPT codes.
Quick Clicks
On the left, you will see button with abbreviated names in them (These are customizable). You will select the number on units and minutes on the right and then click the Quick Click button:
When using this option, please remember that the Units selected in the drop down will remain the same. You will want to adjust the unit count before click on the next button

Once added, it will show in the above ares with the information about united, charges, CPT codes, and Modifiers that are added from the insurance company rules. (59 rules added to Heno will appear when the appointment is checked out)
Procedure Drop Down
You will use the drop down on the right to select the code, select the number of units, minutes, and click the blue Add button:

Once added, it will show in the above ares with the information about united, charges, CPT codes, and Modifiers that are added from the insurance company rules. (59 rules added to Heno will appear when the appointment is checked out)
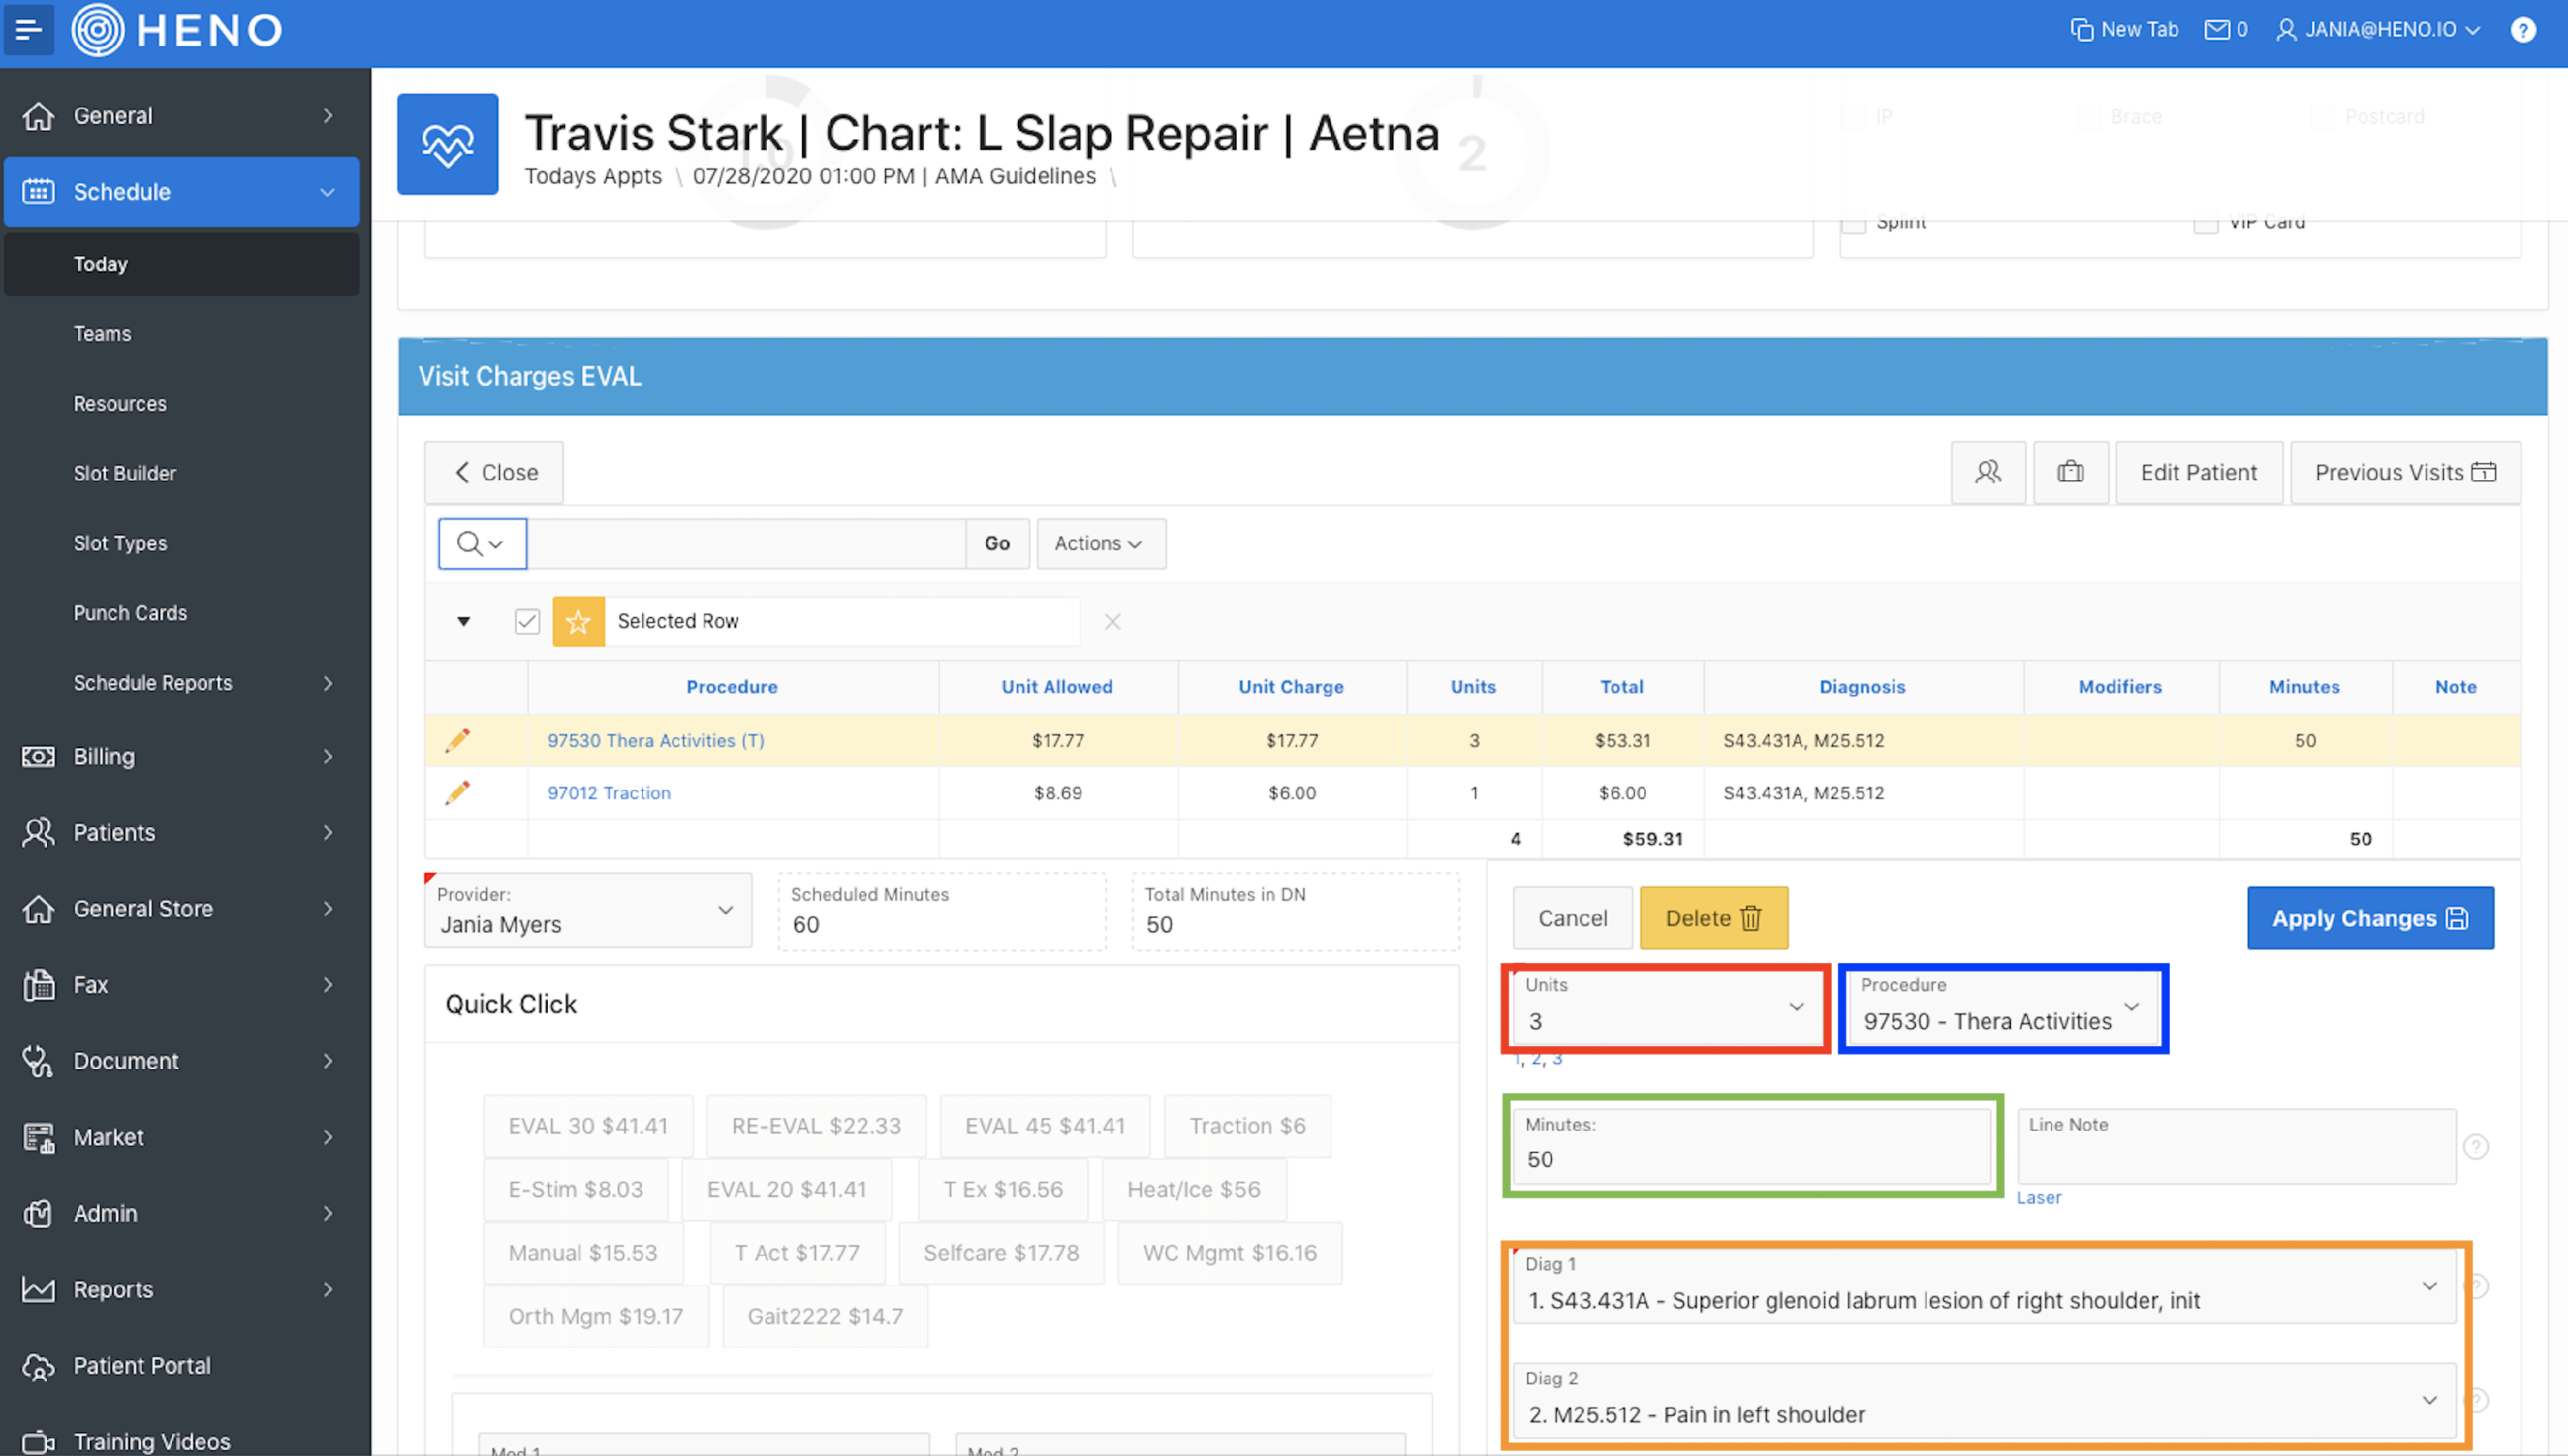
Editing CPT codes on the Check out Screen
**Please Note: If you are using the Flowsheet or the Experience log to enter the CPT codes, we recommend editing the units/time in those areas to reflect appropriately
You will want to click on the Edit Pencil of the CPT code that you would like to Edit. This will bring it into the Procedure Drop down side and highlight the line in Yellow.
This is used to:
- Red: Edit CPT code
- Blue: Edit CPT units
- Green: Edit CPT minutes
- Orange: Edit Diagnosis Codes attached to CPT
Click on Apply Changes to save anything that has been updated
Collecting Payment
Collecting a patient payment can be completed at check in and check out.
Curing check out, you will be able to see more information about all balances on the patients account:
- Red: Co-insurance that is calculated off of the Allowed rate and the patient's policy percentage
- Blue: Co-pay that is connected to the patient's policy co-pay
- Orange: General Store balance if there is an open order with this patient. These are optional, but if selected the order minimum must be collected
- Purple: Statement balance (please note: patient must have an outstanding statement for this to show)
- Green: Grand Total of Balance
 You will then be able to:
- Charge a patient's card using CardConnect integrations
- Collect a Manual Payment for the visit
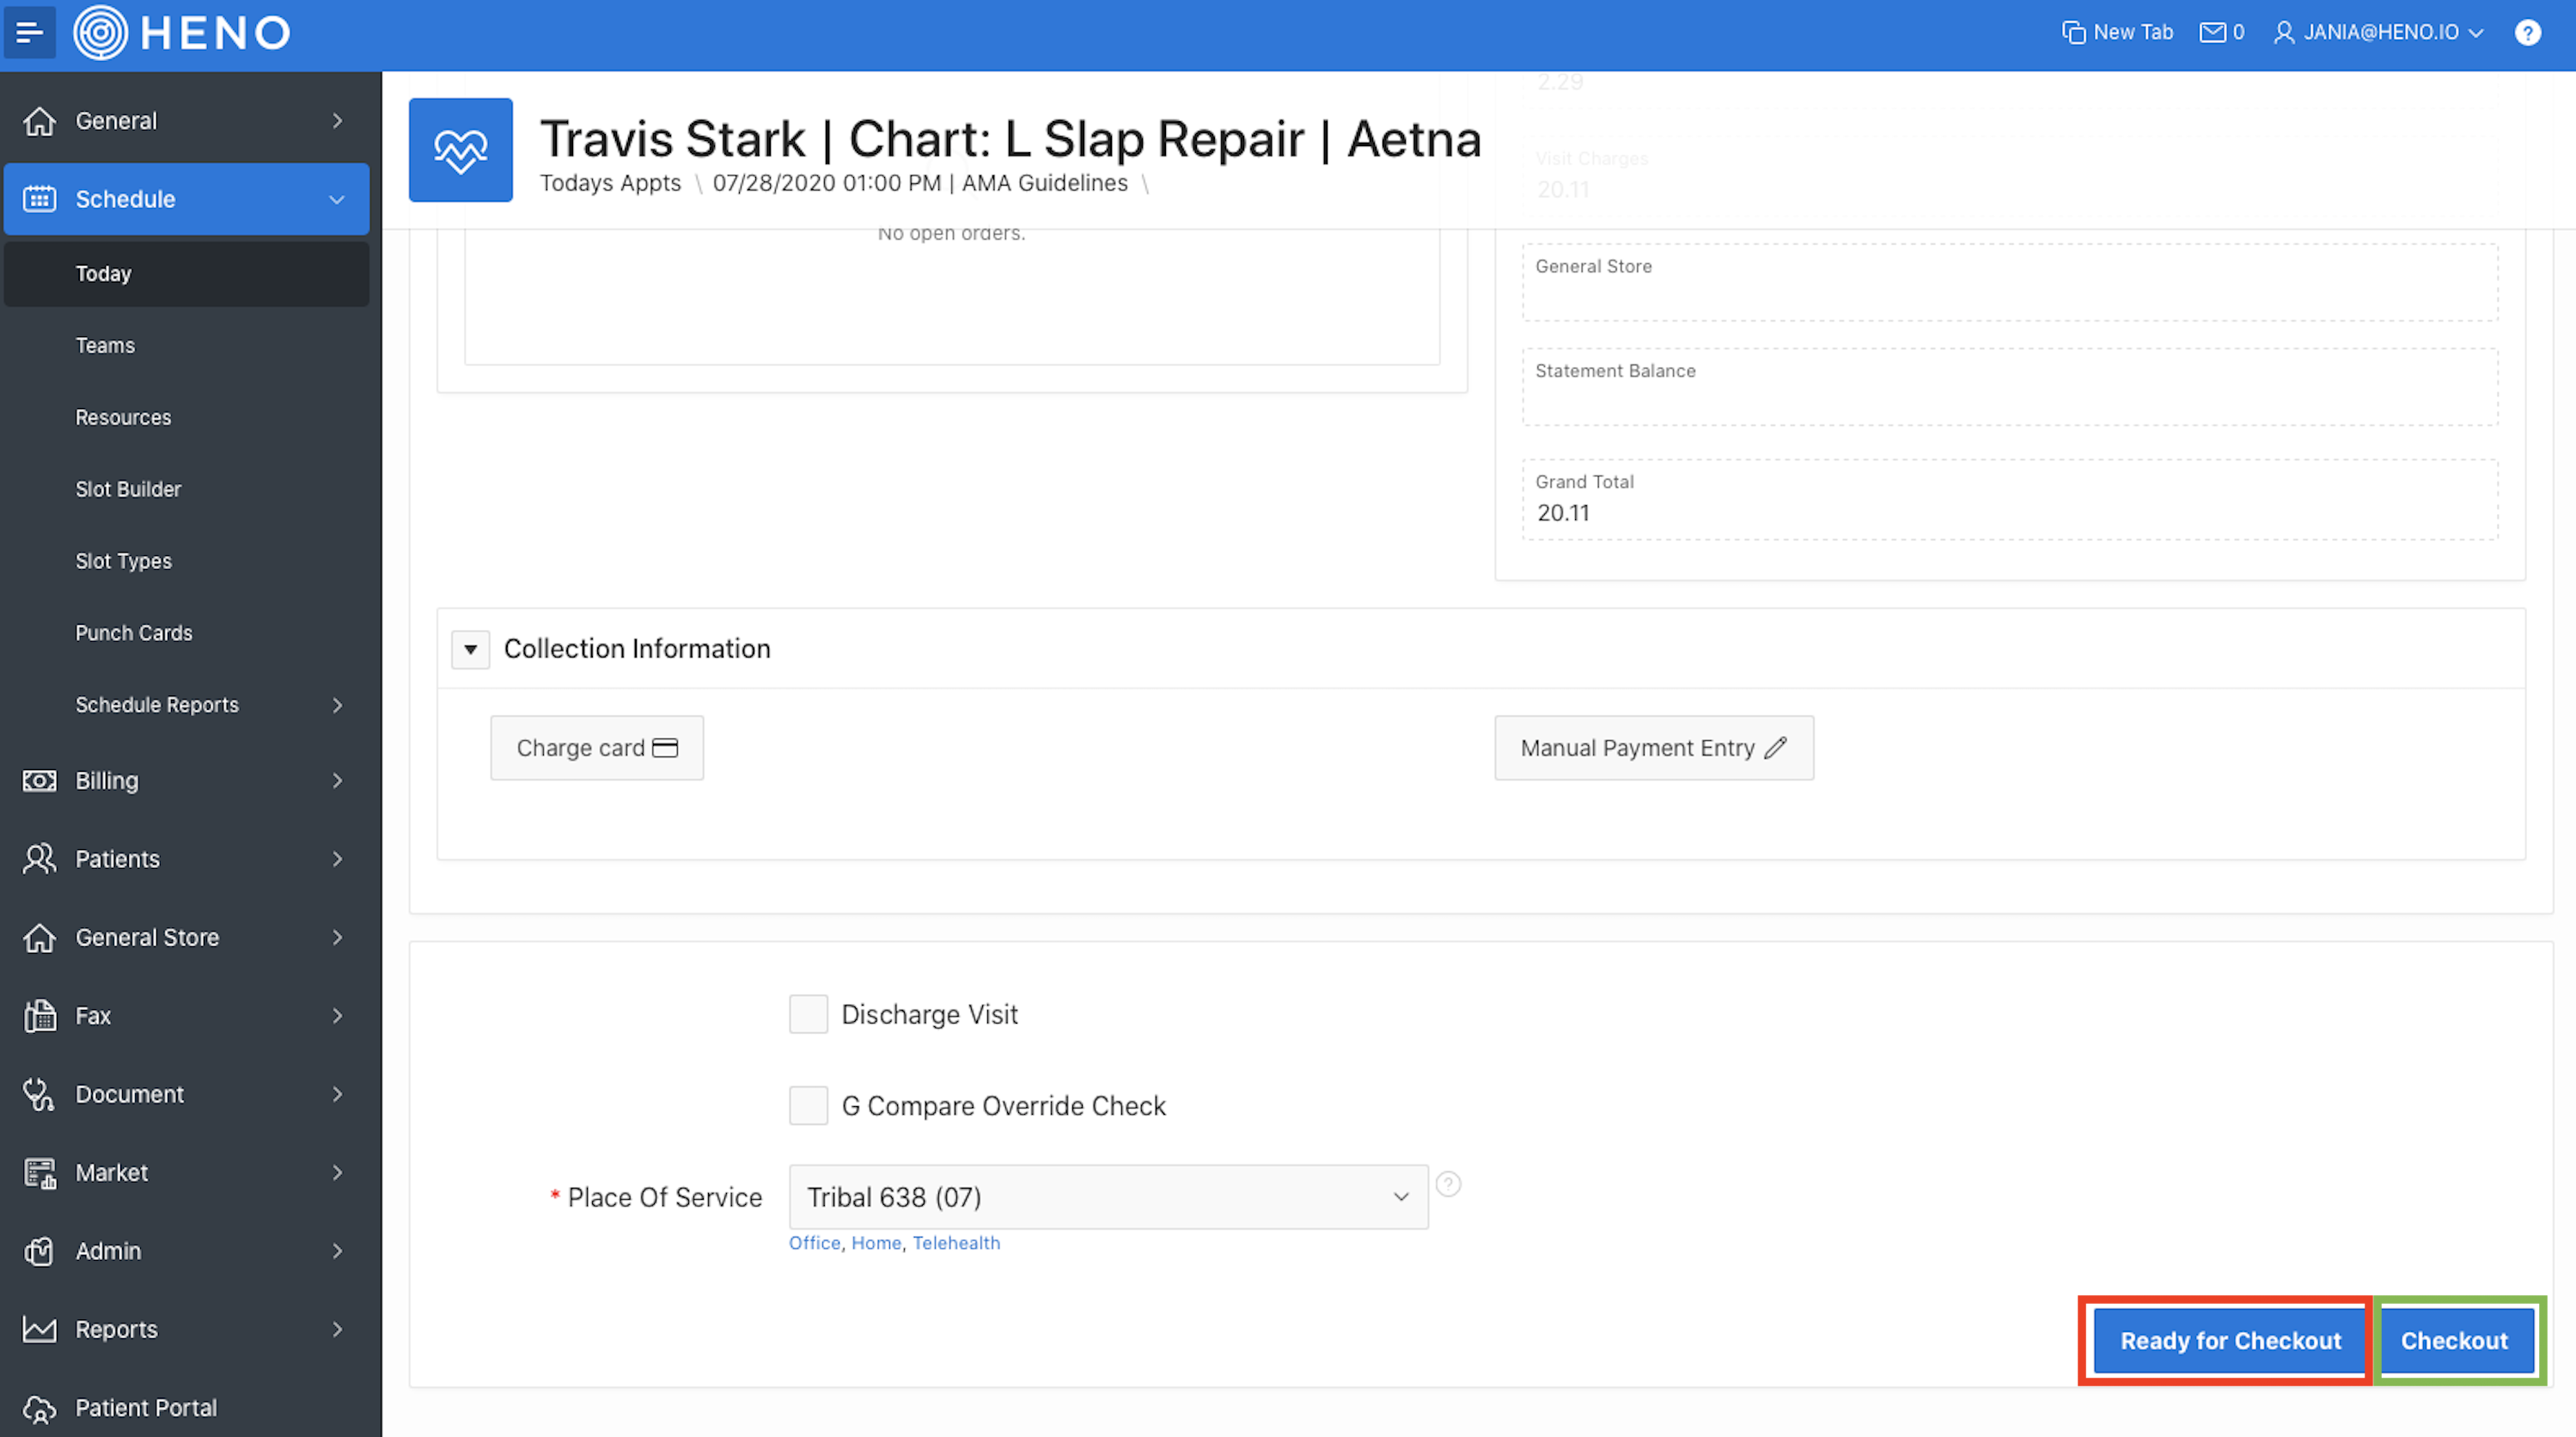
Ready for Checkout or Check out
Once finished with CPT codes, scroll to the bottom and click ready for checkout or check out
- Red: Ready for Check Out - This will change the status on the schedule to (RFC) and give the front office the opportunity to collect Co-insurance, general store orders, and statements balances.
- Green: Check Out - This will skip the front office and send the billing directly to the Encounter (Pre-Claims area) for the billing team
This will change the status on the schedule to
- Ready for Checkout (RFC) with a Yellow box around the appointment:

- Checked out (CO) with a Blue box around the appointment

Visit Slip Preview
Once an appointment has been Checked out, you will be able to view, print, or email a visit slip to a patient.
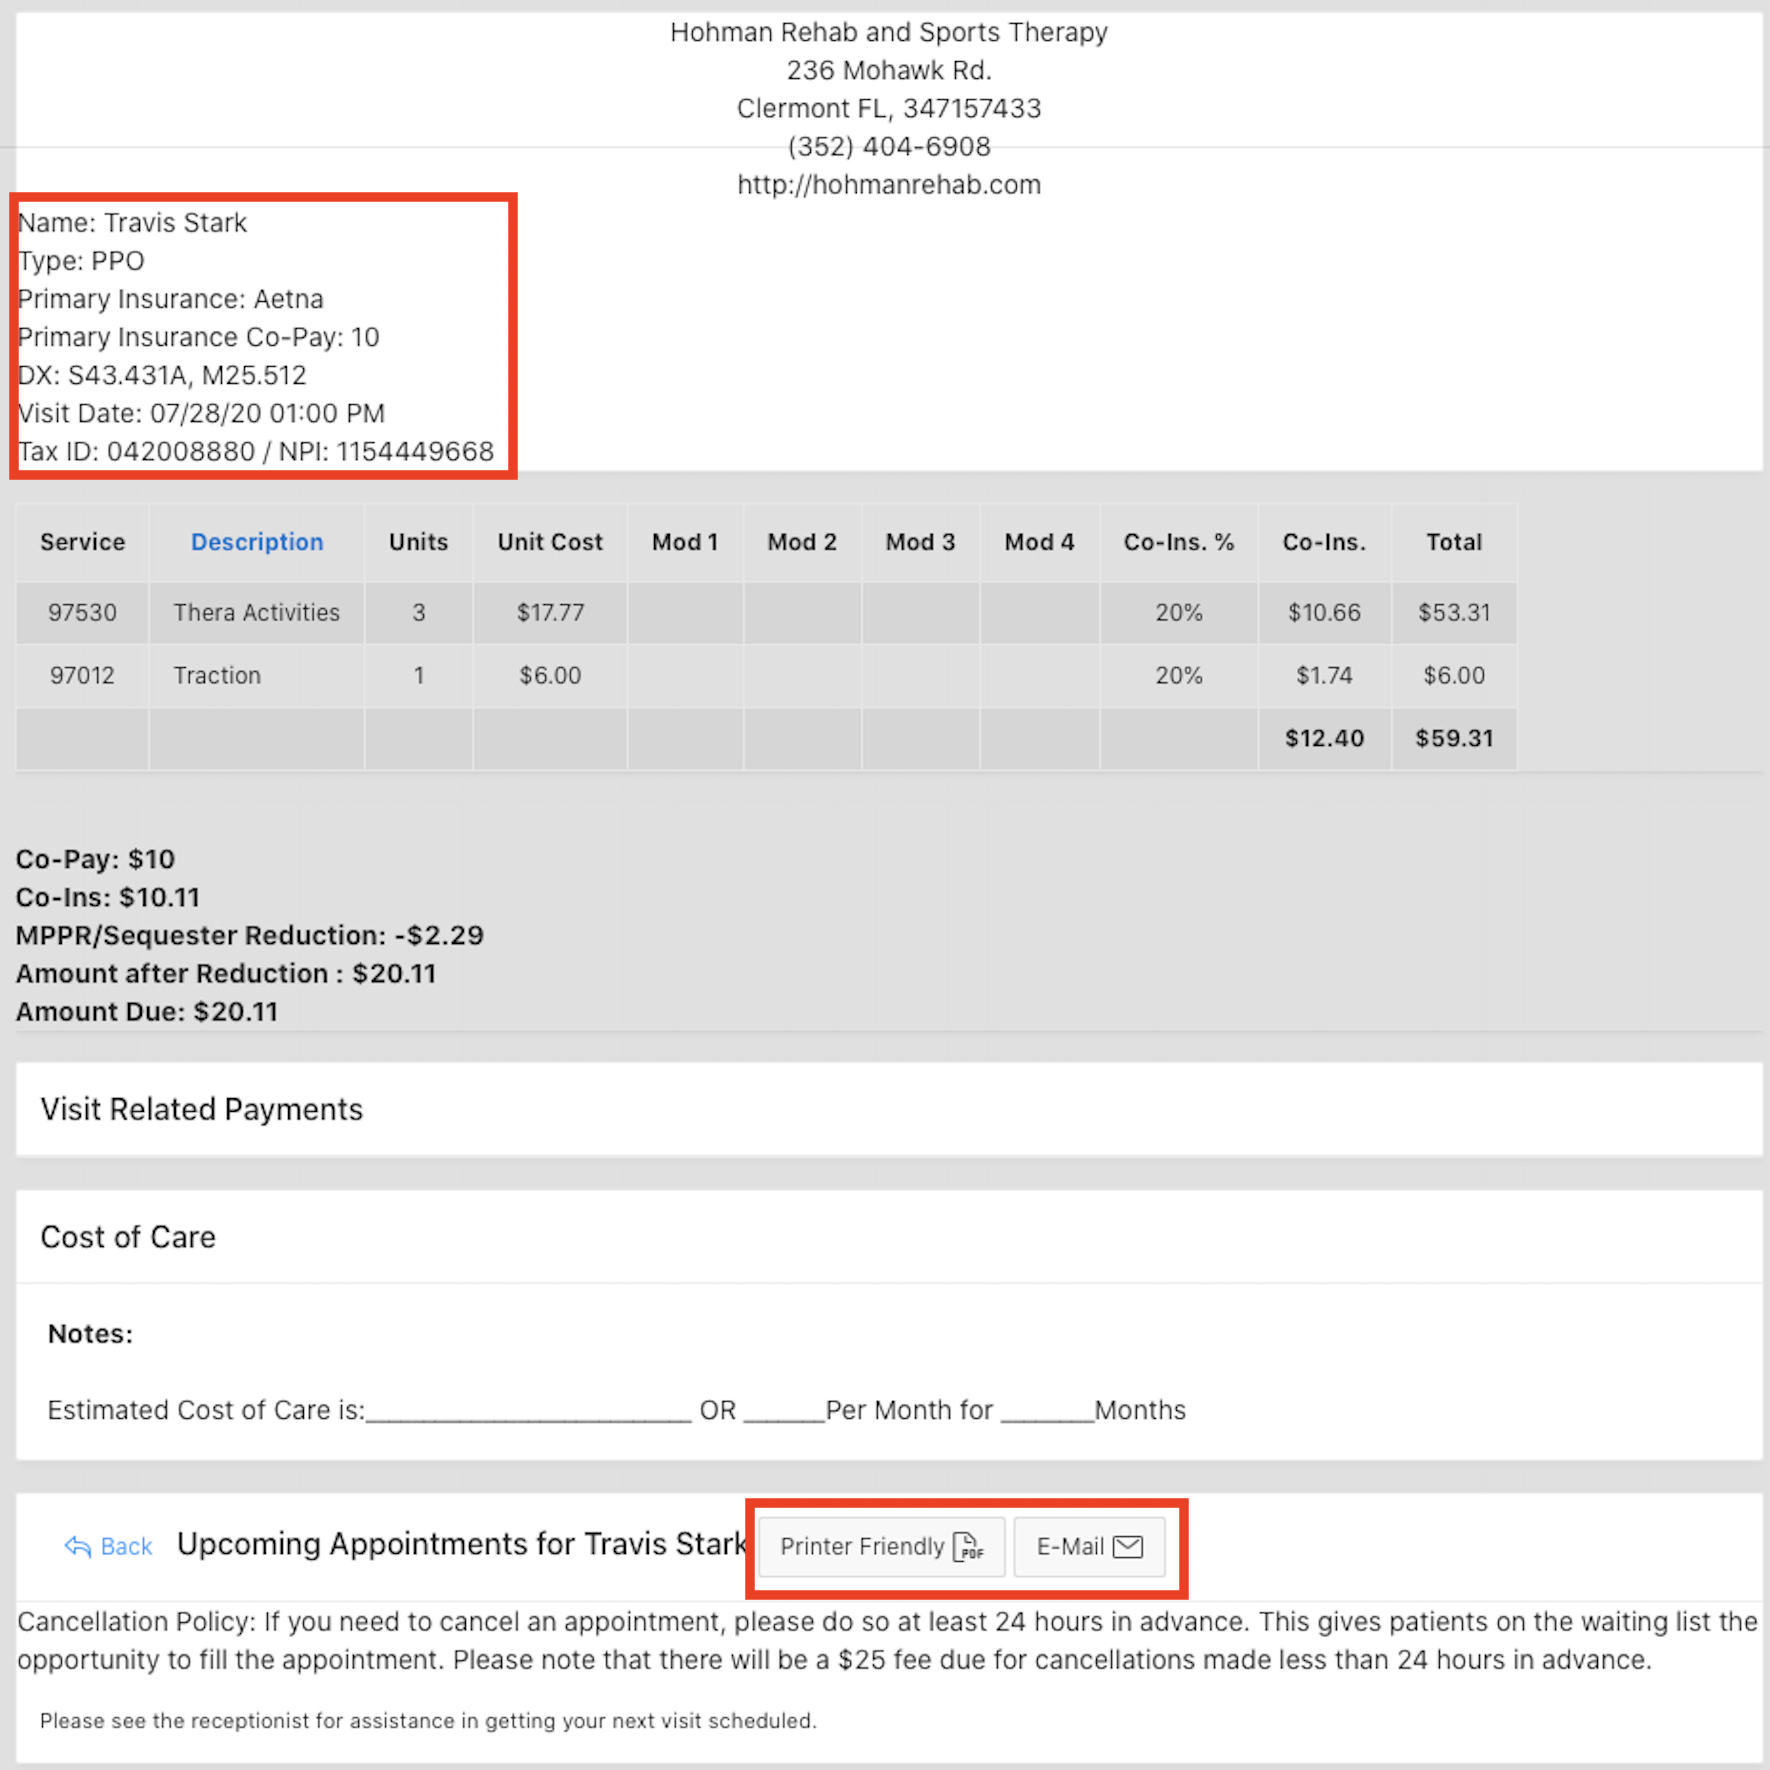
The visit slip will include:
- Practice information: address, phone number, Practice Tax ID, Practice NPI
- Patient information: Insurance, diagnosis codes, visit date
- CPT code information
- Attached payments
