
Step 5. Check in for Appointment
Now that you have added the patient, you can check them in.
*Please Note: The check in can only occur on the same day or after of the appointment. You cannot check in a patient if the appointment is tomorrow or in the future.
To check in a patient, you can either use the schedule view or the report view of the schedule (Schedule tab -> Today)
From the Schedule
You will click on the Schedule tab to preview the Slot view of the schedule. (Be sure to have the Location and Team Selected on the right hand side).
 Click on the appointment you are clicking it. You will get a pop-up and click on the Blue Check in button on the bottom right:
 On the next screen you still see some information about the patient:
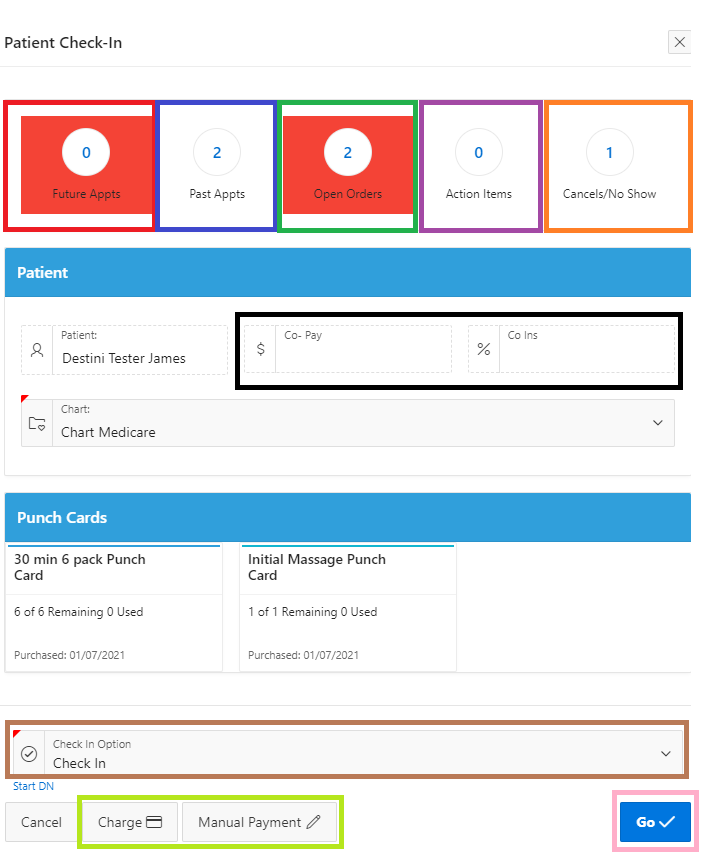
- Red - Future Appts - This bubble will take to a new screen inside the pop-up that will show you all future appointments for the patient
- Blue - Past Appts - This bubble will take to a new screen inside the pop-up that will show you all past appointments for the patient
- Green - Open Orders - Connected to the General Store, it will show you if there is an open order that has been created, but not paid for. This can include anything from a self pay or wellness visit, products, and cancel/no show fee.
- Purple - Action Items - This is an alert on the patient's account that needs to be address. It can include POC Alert, Notification of Cancel/No Show, Payment Plan due, or one that was user created in office. ** Please Note: These must be address prior to checking out the patient.
- Orange - Cancels - This bubble will show you all cancels and no shows that patient has done.
- Black - Policy Information - Once a co-pay or co-insurance percent is added to the patient policy, the information will display here to either collect at check in or out.
- Light Green - Payment information - If you are collecting at the check in, this is where you would put your payment information.
- For Card processing, please see these articles: HENO Card Processing
- Brown - Check in & Start Note - This will check the patient in and go directly into the patient's documentation Daily Note.
- Pink - Check In - This will take you back to the schedule and change the status of the appointment to checked in now with the abbreviation of (CI) in front of the patient name and an orange boarder on the appointment
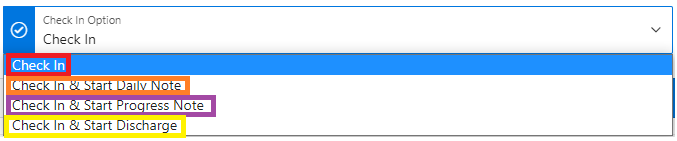

- Red - Only checks the patient in
- Orange - Checks patient in & starts a Daily Note
- Purple - Checks patient in & starts a Progress Note - For Non-Eval Slots Only
- Yellow - Checks patient in & starts a Discharge note - For Non-Eval Slots Only
- Blue - Checks patient in & states an Inital Evaluation - For Eval Slots Only
To confirm if your slots are Eval or Non Eval, take a look at Creating Slot Types

If you have any question or concerns, please email support at Support@heno.io