
How to Create Encounters without an Appointment
In this Article
Creating an Encounter without an Appointment (Coming October 23, 2021)
We have a new option inside our encounter screen.
This can be found inside the Billing tab -> Encounter (Pre-Claim)
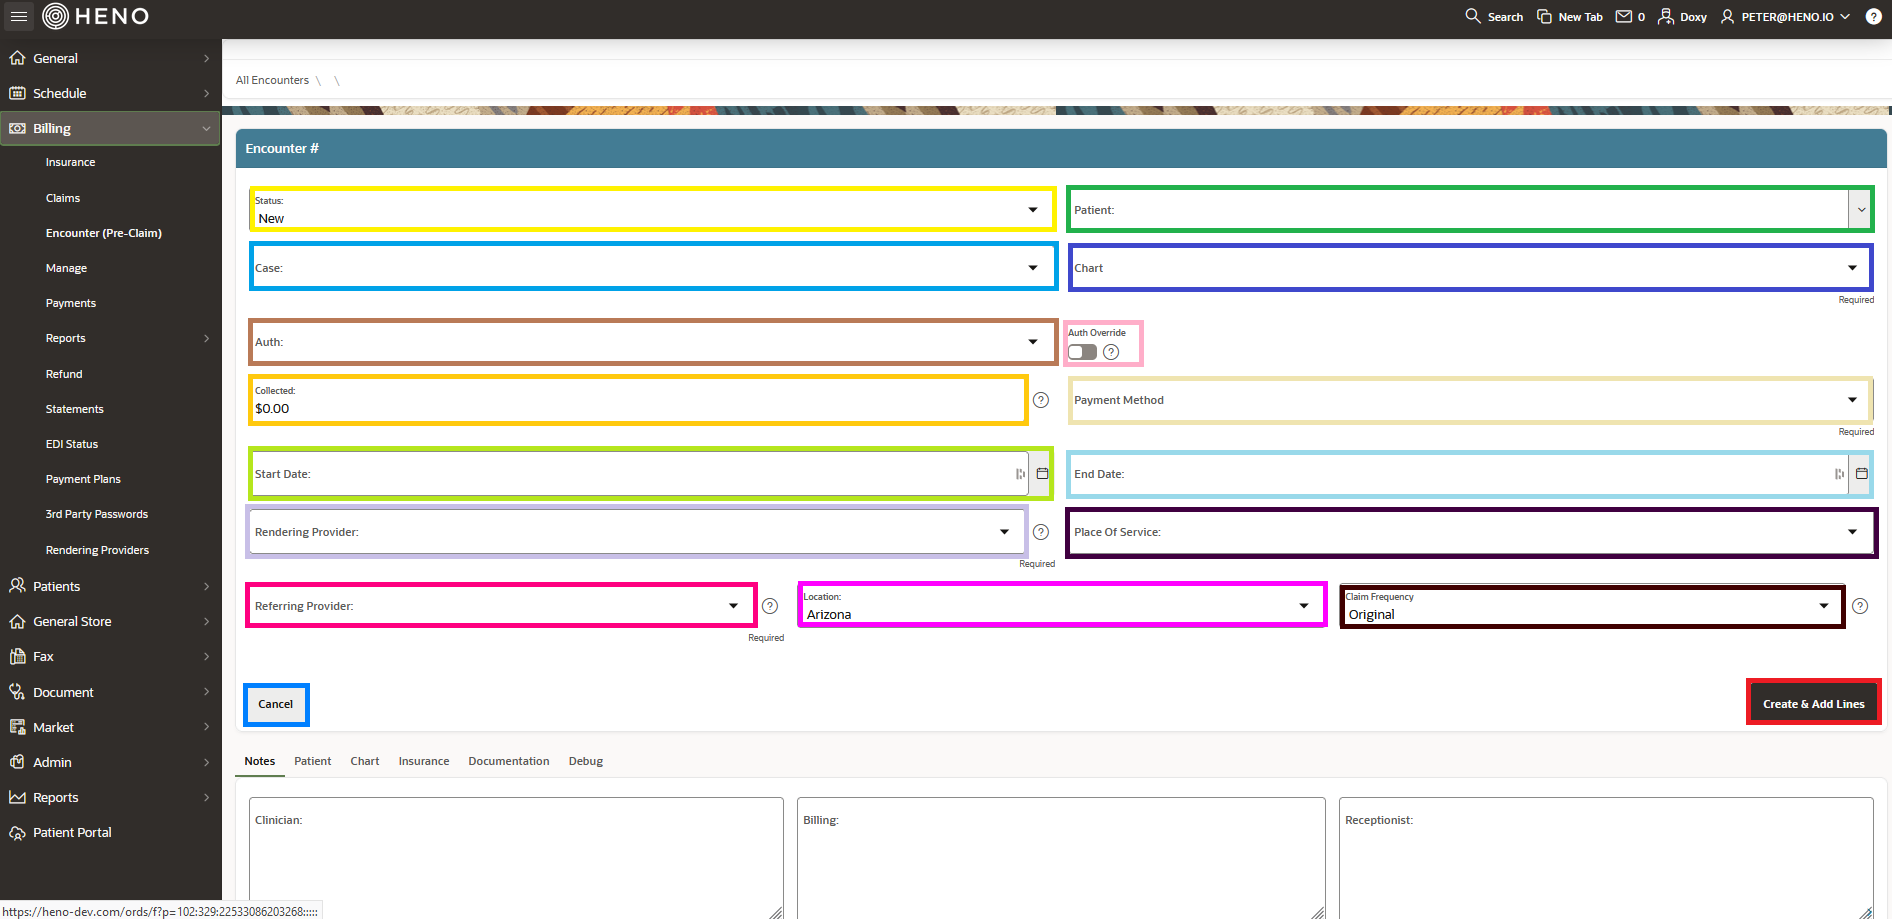
 To start a new encounter without an appointment click on create
 This gives you to option to enter the following information.
Black - Status of Encounter Most Common are New, Hold, Approved, Ready.
Gray - Patient use the dropdown arrow to select the patient you want to use. This box is required.
Dark Red - Case this holds the insurance policy you will use. This box is required.
Lavender - Chart this holds the Diagnosis information and the body part that is being worked on. This box is required.
Red - Auth this is the attached authorization this can be found in case>insurance>policy. The Auth override is used If for some reason an Auth is not needed for this visit this option can be selected to override the Authorization validation.
Oange - Collected used when payment is collected from the patient. The Payment Method drop down will show Cash, Debit, Credit Card, Check
Yellow - Start Date and End Date This is the start and end date of service. This box is required.
Green - Rendering Provider choose the rendering provider that will be sent on claim. This box is required.
Turquoise - Place of Service Codes are codes placed on health care professional claims to indicate the setting in which a service was provided selected one from the drop down list. This box is required.
Indigo - Referring Provider select the provider who referred the patient.
Purple - Location
Brown - Claim Frequency
Original (1) - Initial Claim Submission
Replacement (7) - Replace Previously Submitted Claim See PCN
Void (8) - Voids Previously Submitted Claim See PCN
Pink - PCN This is the Payer Control Number for the claim we're replacing/voiding. Some Electronic payers will not recognize the Heno Claim # and instead want their Claim ID or, Payer Control Number (PCN) which should be included in previous ERAs/EOBs and/or from the Insurance Companies website
Lime - Cancel selecting this will cancel the encounter.
Light Turquoise - Create and Add Lines selecting this will allow you to add lines of service for the selected patient.
Once you click create and add lines an encounter number will be assign and you can click add lines at the bottom left of the screen to enter CPT codes.
Red - Encounter Number assigned
Yellow - Add lines of service to encounter
 After you click on add lines the below box will open up for you to add charges in.
Black - Produce Code add code desired in will pull price from billing>manage>procedure or from billing>insurance>company rate or billing>insurance>plan>plan rate
Gray - Units number of units to be entered
Dark Red - Allowed will recalculate on save.
Exclude Line from Send this will stop this line from being sent to the payer example if payer does not pay for ice pack.
Orange - Modifiers
Yellow - Diagnosis Codes Will auto pull from patients>chart
Green - Billed Amount Override If a value is entered here it will override the PER unit BILLED amount
Turquoise - Allowed Amount Override If a value is entered here it will override the PER unit ALLOWED amount
Light Turquoise - Line Note This is the Line Note field of Loop 2400 or, Box 24 Shaded on CMS 1500
Indigo - Units or Minutes
Purple Start and End date will update on save
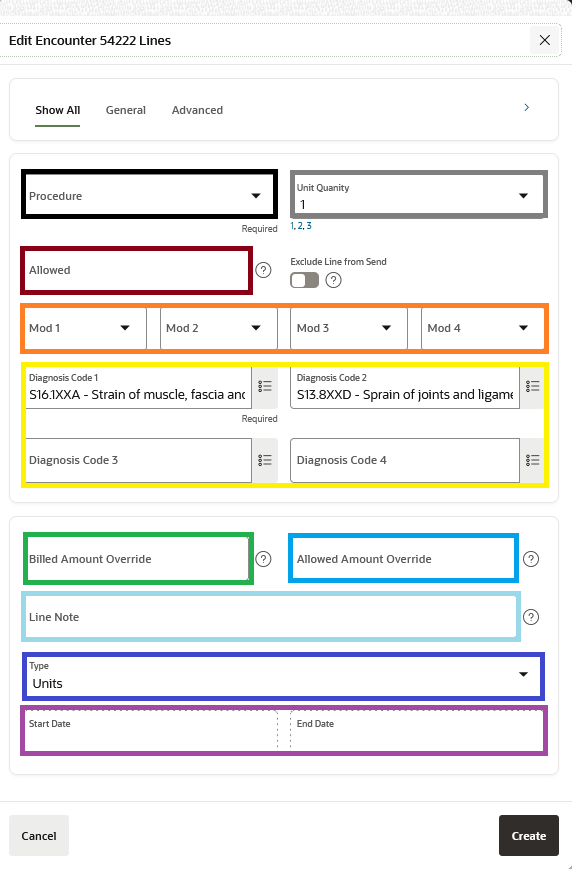
Once you click create you line will be added to this encounter you can continue to add more lines by clicking add line. If you are finished click one approve and next to send this to the claims send area in Heno or apply changes to save and continue to work on this encounter at a later time.
 Once approved and next is selected you claim will be ready to send in billing>claims>send claims you can verify this by clicking on view pending claims.
 Example of pending claims to submit
 When ready to submit click submit electronic claims
 If you have any questions please contact support@heno.io for further assistance.